Git, GitHub, and IntelliJ
IntelliJ has built-in support for Git as well as integrations for GitHub. This means that you can use IntelliJ as a graphical user interface for Git, never having to touch your terminal!
Tip
It's still a good idea to familiarize yourself with how to use Git from the command line. While using IntelliJ unlocks greater productivity, the basics of Git are still best learned from the command line.
Cloning a Repository from IntelliJ
Depending on the version of IntelliJ you are using, you may be able to clone a repository from the welcome screen or from the File > New Project > Get from VCS menu.
To access the welcome screen, launch IntelliJ or close the current project you have open with File > Close Project. You should see a screen like this:

Clone your repository by clicking on Get from Version Control and entering the URL of your repository.
Not Working?
Check whether you have Git installed on your computer. See git setup for more information.
Checking File Status
Project View
The project view in IntelliJ will show you the status of your files. Files that are not tracked by Git will be shown in red, and files that are created will show up in green. Files that have been updated will show up in blue. For more information, visit JetBrain's documentation regarding file status highlights.
Changelist
The changelist view in IntelliJ will show you all the files that have been changed since the last commit. You can open the changelist view by clicking on the Commits or Version Control tab on the left of the screen.
Tip
If you remember from git add, you need to add files to the staging area before you can commit them. IntelliJ makes this process simpler by incorporating a changelist, which can automatically pick up when files have been changed.
Like the project view, files color will be determined by their status.

Branch Management
In IntelliJ IDEA, all operations with branches are performed in the Git Branches popup. To invoke it, in the main window header, click the Git widget with the name of the branch that is currently checked out:


Cant Find It?
Depending on the version of IntelliJ you are using, you may see a different version of the Git Branches Popup or the Branches pane. The functionality is the same, but the UI may be different. Visit JetBrains official documentation for managing branches for more information.
Syncing
With the git branches popup, IntelliJ will inform you if there are incoming commits.

Tip
The most common way to sync changes with a remote repository is with Updating Project. Feel free to skip to there.
Fetching Changes
Fetching with IntelliJ does the same as git fetch. It will download the latest commits from the remote repository, but will not update your local repository.
To fetch the latest updates, use Git > Fetch or use the Branches popup and click 
Updating Branches
Use update if you need to sync a specific branch with its remote tracked branch. This is a convenient shortcut for fetching and subsequently applying changes to the selected branch.
In the Branches popup or in the Branches pane of the Version Control tool window, select a branch and choose Update from the context menu.
Info
IntelliJ IDEA will pull changes from the remote branch and will rebase or merge them into the local branch depending on which update method is selected in Settings > Version Control > Git.
Pulling Changes
Pulling with IntelliJ does the same as git pull. It will download the latest commits from the remote repository and update your local repository.
To pull the latest updates, use Git > Pull and the pull dialog will appear. 
What are the Additional Options?
--rebase: after fetching the changes from a remote branch, IntelliJ IDEA will rebase local unpushed changes onto the fetched changes.
--ff-only: the merge will be resolved only if it is possible to fast-forward.
--no-ff: a merge commit will be created in all cases, even if the merge could be resolved as a fast-forward.
--squash: a single commit with all pulled changes will be created on top of the current branch.
--no-commit: a merge will be performed, but a merge commit will not be created so that you can inspect the result of the merge before committing.
To learn more about the additional options when pulling changes, visit Git's pull documentation here
Updating Project
When running git pull, Git will automatically run git fetch and git merge. However, the updated version only applies it to one specific branch. With Update Project, IntelliJ will apply the changes to all branches.
With the main menu, choose Git > Update Project or Ctrl+T. This will open the Update Project dialog.
Select the update type Merge. Merging will apply the changes from the remote repository to your local repository. This the same as git merge.
Tip
This is the most common way and convenient way to sync changes with a remote repository.
Committing and Pushing Changes
After you've added new files to the Git repository, or modified files that are already under Git version control and you are happy with their current state, you can share the results of your work. This involves committing them locally to record the snapshot of your repository to the project history, and then pushing them to the remote repository so that they become available to others.
Set your Git Username
Git needs to know your username to associate commits with an identity. If you have not set your username, IntelliJ IDEA will prompt you to specify it when you first attempt to commit changes.
Shortcuts
| Action | Shortcut |
|---|---|
| Commit Tool Window | Alt+0 |
| Commit | Ctrl+K |
| Commit and Push | Ctrl+Alt+K |
| Push | Ctrl+Shift+K |
Committing Changes
Open the vertical Commit tool window Alt+0 located on the left:
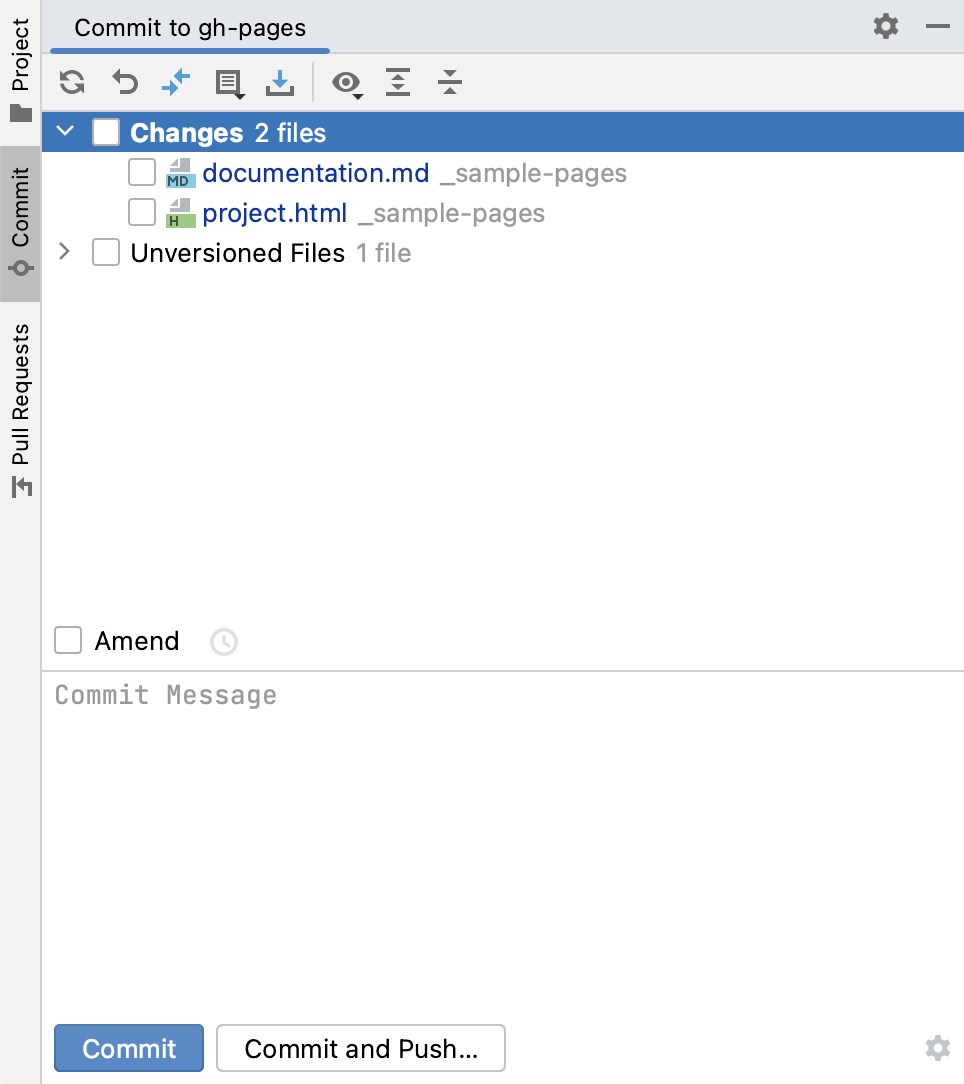
As your changes are ready to be committed, select the corresponding files or an entire changelist.
Tip
If you press Ctrl+K, the entire active changelist will be selected.
You can also select files under the Unversioned Files node — IntelliJ IDEA will stage and commit these files in one step. Beware that this action will add all unversioned files to the repository, which could potentially include files which are private or contain sensitive information.
Enter the commit message. You can click Commit message history button  to choose from the list of recent commit messages.
Tip
You can also edit the commit message later before you've pushed the commit.
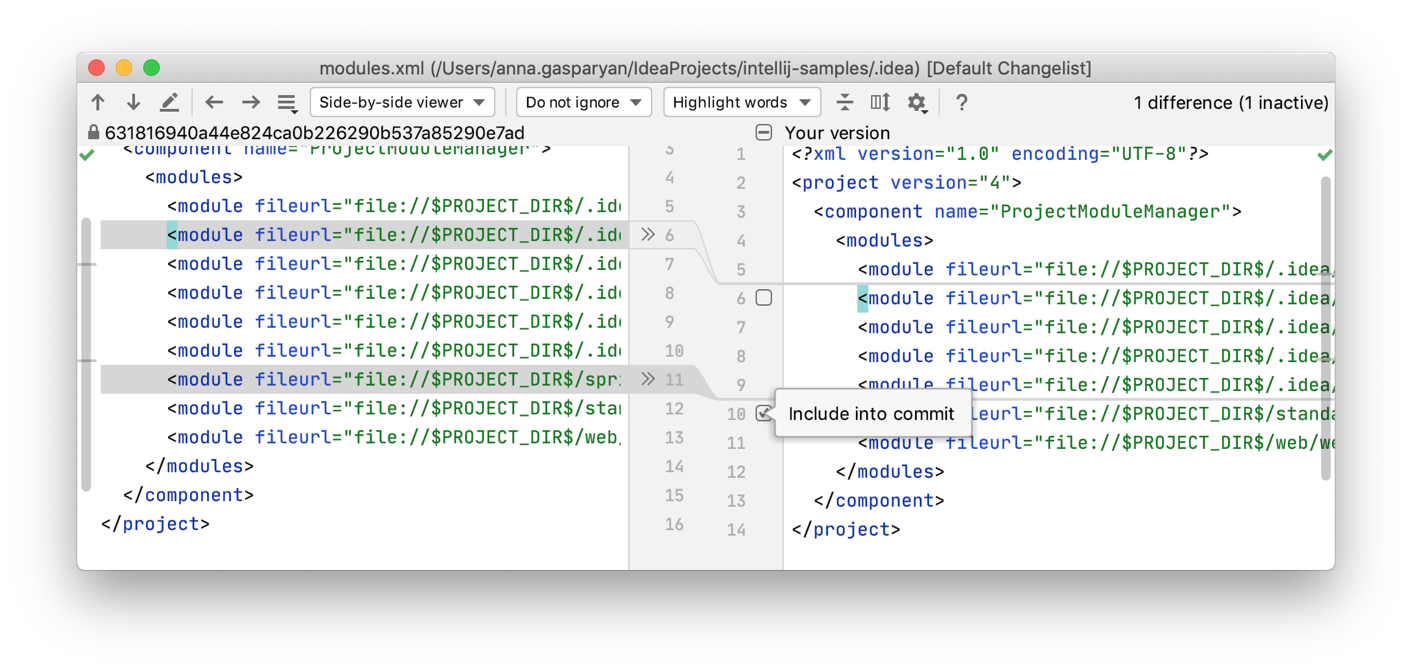
Committing Partial Changes
Sometimes when you make changes that are related to a specific task, you also apply other unrelated code modifications that affect the same file. This isn't desirable because we want to be able to break down our changes into smaller, more manageable commits, rather than one large chunk.
IntelliJ IDEA lets you commit such changes separately in one of the following ways:
Selecting chunks to commit
-
Open the vertical Commit tool window Alt+0 located on the left
-
To display the differences between the repository version and the local version of the selected file, in the Commit tool window Alt+0, click the Diff icon
 on the toolbar or press Ctrl+D.
 -
Select the checkbox next to each chunk of modified or newly added code that you want to commit, and leave other changes unselected:
-
Click Commit. Unselected changes will stay in the current changelist, so that you can commit them separately.
Putting changes on a different changelist
-
When you make a change to a file in the editor, click the corresponding change marker in the gutter.
-
In the toolbar that appears, select the target changelist for the modified code chunk (or create a new changelist):
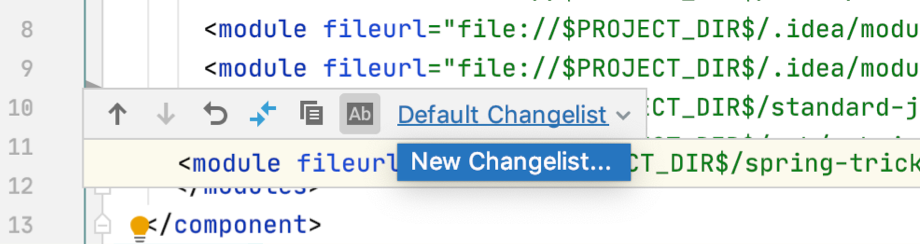
-
Commit each changelist separately.
Pushing Changes
To push changes from the current branch press Ctrl+Shift+K or choose Git > Push from the main menu.
Danger
Do not force push unless you know what you are doing. Force pushing will overwrite the remote repository with your local repository - all previous commits will be lost 
Pull Requests
While IntelliJ has a pull integration with GitHub, we encourage you to use the GitHub website to create and manage pull requests. However, if your still curious, you can visit JetBrains documentation regarding pull requests